Holographic Imaging |
MAS.450/854
|
The coffee cup hologram demonstration, or "coffee cup demo," is designed to show new students of MAS450 a basic but widely-used holographic setup and how it works. The holographic exposure process exposes a photographic plate to light from two sources: an information-bearing source (in this case, a reflection from a coffee cup) and an informationless reference source (a diverged beam of light shining on the plate). A very fine interference pattern is formed in the photosensitive emulsion of the plate. The chemical process of development enhances this pattern and makes the plate relatively insensitive to further exposure.
This "fringe pattern" in the hologram appears meaningless to the naked eye. However, it has the property of recreating the object beam's wavefront when it illuminated with a beam of light coming from the same direction as the original reference beam. When a viewer looks at the illuminated hologram, he or she sees the wavefront and interprets it as if it were light coming from the original object. Unlike the case of a photograph, the three-dimensionality of the original object is preserved by the hologram.
Many concepts are at work in this demonstration. We will discuss them throughout the course. Before the lab portion of MAS450 is completed, you will be able to build a exposure setup such as this one, tune it for the particular type of image you are making, explain why it is constructed as it is, predict its optical characteristics, and use it to make images that will (hopefully!) impress you and your peers.
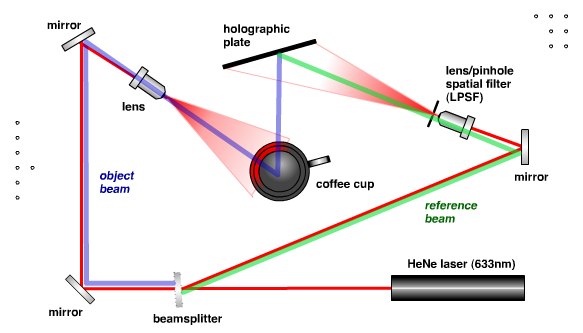
The optical setup used to expose the hologram is shown above. Light from a coherent light source, a Helium Neon laser emitting light at 633nm, is split into two beams using a beamsplitter. The beamsplitter here is just a thick piece of glass. The weak beam that reflects off its front surface is called the reference beam. It is bounced off a small mirror and then diverged by a microscope objective to cover the holographic plate. An optical device called a pinhole located just after the objective is used to "clean" the beam of minor imperfections.
The stronger beam that passes through the glass of the beamsplitter is bounced off two mirrors, diverged by another objective, and used to illuminate the coffee cup demo object. Light from the coffee cup is scattered in all directions. Some of it is directed towards the holographic plate, where it intersects the light from the reference beam. Because of the properties of coherent light, an interference pattern is formed at the plate. The plate itself is made by Afga, and is of type 8E75. You'll learn much more about holographic plates during the class.
Since the fringe pattern in the emulsion is extremely fine (greater than 1000 lines/mm), holographic exposure is quite sensitive to vibration or other physical actions that could cause any minute change in the optical path length of either exposing beam. For this reason, the optical components used in this experiment are attached magnetically to a special floating optical table. This table is specifically designed to minimize vibration. Some of the early labs in class will investigate the effect of vibration.
The exposure process requires the beams to shine on the plate for a certain amount of time so that enough photons can expose the highly-insensitive emulsion of the holographic plate. In a process that took place before class, the amount of light from the two beams was measures using a light meter, and using this intensity value the exposure time for the hologram was calculated. The lights in the room were turned off, a holographic plate was mounted on the plate holder, the optical table was allowed to "settle," and finally, the holographic exposure was made.
The holographic plate was processed using chemicals very similar to that used in black and white photography. A developer turns exposed silver halide grains in the photographic emulsion into grains of silver. These tiny silver grains appear black. After about four minutes in developer, the plate is moved into an acidic bath, called stop bath, that neutralizes any developer in the emulsion. Another chemical bath, known as fixer, is then used to render all remaining photosensitive material in the emulsion water soluble. The plate is then washed in water for a few minutes.
The last major chemical in the development process is called a bleach. Bleaching turns the remaining silver in the emulsion back to silver halide, which is essentially clear. In normal room light, the plate looks clear (or maybe a little dirty). After bleaching, the plate is washed in water again, then dried.
For in-class observation, the pre-exposed and developed hologram has been re-mounted on the plate holder at a location very close to that in which it was exposed. The original reference beam is used to illuminate the plate. This illumination source is diffracted into many different directions, a subset of which reconstruct the wavefront of the original object. You can observe and compare both the original object and its holographic mimic.
Please, ask questions about things you observe.
This exact holographic setup will be used to introduce you to holographic exposure and photochemical development in the first lab during the third week of class. By the fifth lab in mid-October, you will have sufficient knowledge and lab proficiency to build this setup from scratch, make images with it, and analyze their optical properties. Variations of this optical setup are probably the most widely used of any in the field of holography, so you'll soon be very used to seeing it.