Fashionable Pepper’s Ghost

For my Pepper’s Ghost project I decided to piggyback off of an idea that Professor Novy sent out to the the class. The project was called the aspire mirror; when the user peered in to the mirror, it reflects what the user is inspired by. Here’s a link to the website.

http://www.aspiremirror.com

With a half-silvered mirror and a massive 8k tv, I had all the technology I needed to start creating my project. After studying a great deal about pepper’s ghost and seeing the aspire mirror, I realized I could use this method to create a new form of online shopping technology!

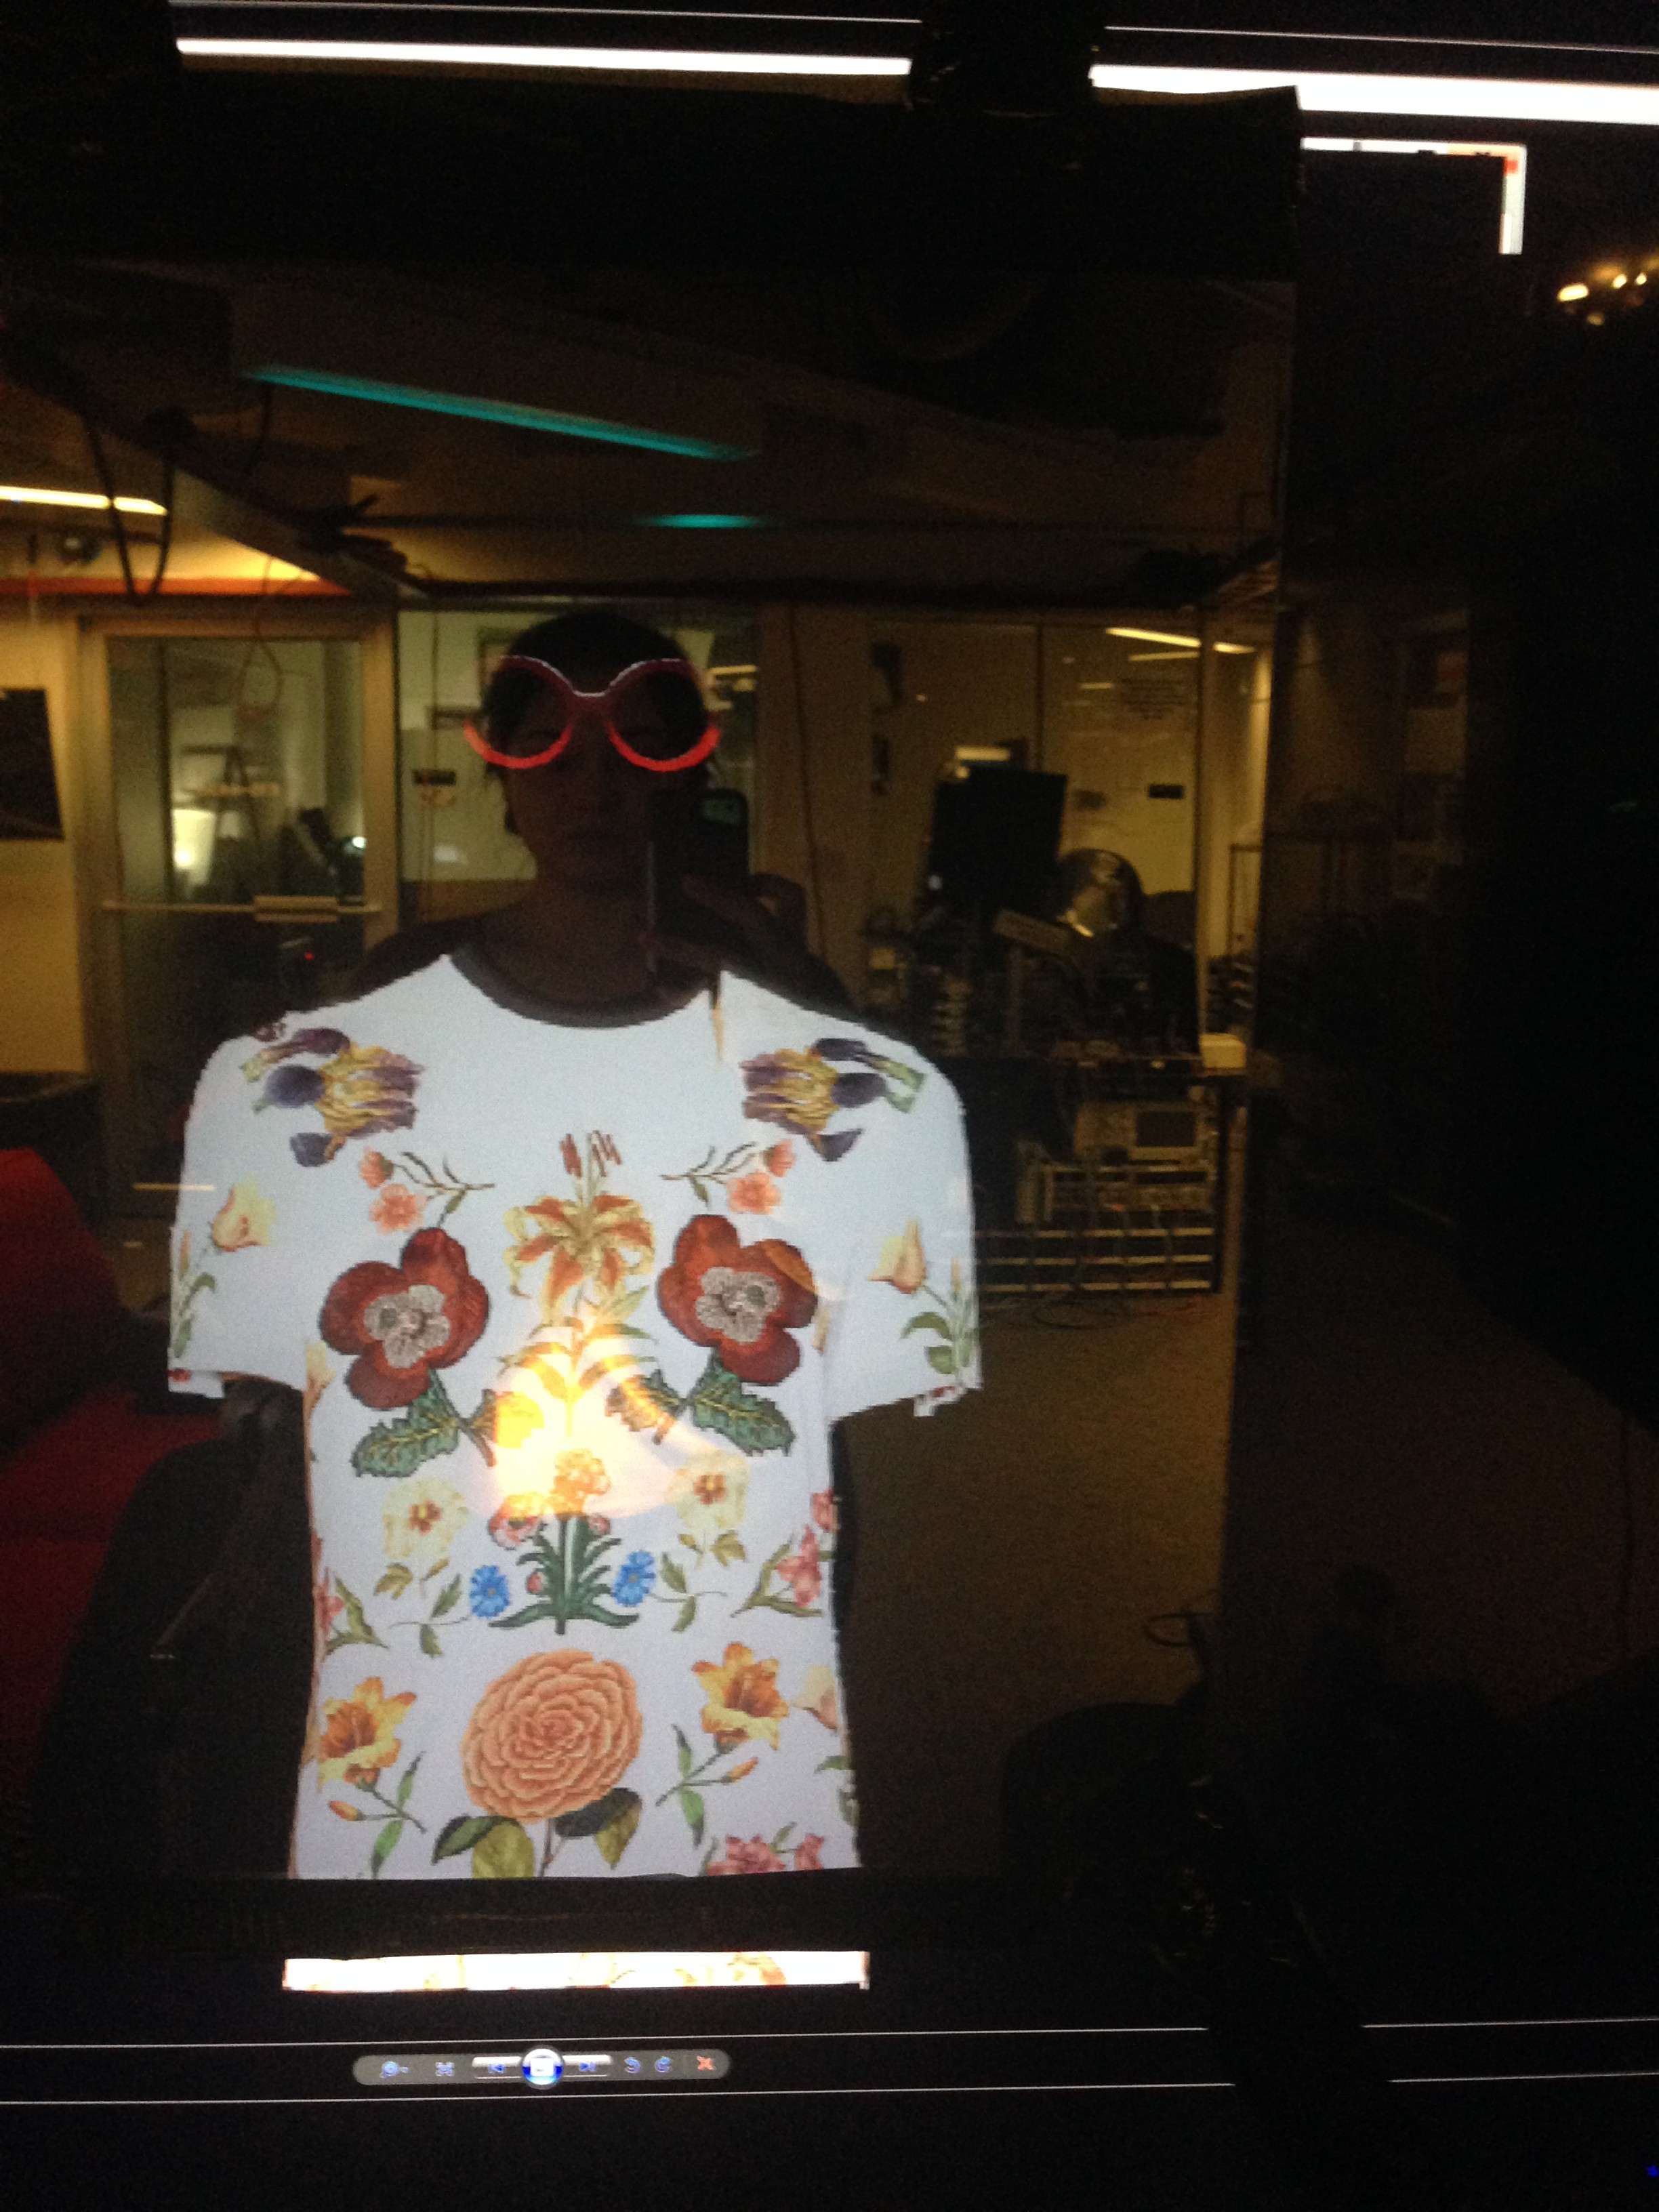
This project works best in a room with natural lighting. Unfortunately the 8k tv I had available was in dark room so I had to provide some lighting with artificial lights, but when creating this effect in my room with sunlight over my computer screen it worked much better. I first placed the half-silvered mirror over the 8k tv as closely to the screen as possible. On the 8k tv behind the mirror I created a black background. Since the background behind the mirror on the tv was darker than the light in front of it,the mirror reflected my image back at me.  I then found items for sale online like a shirt or sunglasses and cut their images out, placing them on back backgrounds. After some very very careful positioning. I flipped through a slideshow of images to present what the future of online shopping would be like! First I showed the main websites regular online shopping page. I displayed the items for sale through the mirror (This showed through the half silvered mirror like  a regular screen). Then I chose an item to model by showing the item placed on a black background; wherever the black background on the tv was, I saw a reflection but wherever I had placed the item, that showed through!

Some complications of this project were trying to get the half-silvered mirror to stay on the 8ktv (I ended up duck taping it up), placing the objects to fit exactly on the right spot on my body in the reflection, and getting the lighting to work in the 8ktv room. In the future I think a good addition to this project would be to add an Xbox kinect or some other device to track exactly where body parts are to overlay images on top of them.

Below is an image of the final output on the 8k tv. Better images hopefully to come soon!

IMG_6901

Pepper’s Ghost

One of the most alluring pieces of equipment I have ever encountered is the phoropter, which is used by optometrists during eye exams to assess a subject’s vision and ascertain that subject’s eyeglass prescription.  The following link offers a description of phoropters, accompanied with pictures: https://en.wikipedia.org/wiki/Phoropter.  As a young child, I recall being pleasantly intrigued by watching my optometrist whirl the lenses and prisms in the device around with ease to alter my view; the swift changes seemed somewhat magical to me.  During eye exams, optometrists place a phoropter over a subject’s eyes and ask the subject to read a series of letters both close up and far away.  They iteratively change the lenses and other optics in the device to deduce the optimal prescription of the subject.  However, to my knowledge, optometrists have not yet implemented the Pepper’s Ghost illusion in conjunction with phoropters.  Since the ghost image is fainter than the object itself, a Pepper’s Ghost eye exam would be more challenging than the traditional one.  This would prove especially valuable for accessing candidates to jobs with strict vision requirements, such as astronauts.

I made a basic phoropter using two circular cut-out pieces of white cardboard and four pairs of lenses.  The lenses are displayed and labeled in the picture below.  As distinguishable from the labels, the types of lenses used were thick positive spherical, spherical meniscus, meniscus, and thin positive spherical.  An interesting aside fact I learned after reading about lenses is that plus lenses are synonymous with convex lenses, whereas minus lenses are synonymous with concave lenses.  Plus lenses are prescribed to fix farsightedness and minus lenses are prescribed to fix nearsightedness.  The two thick positive spherical lenses shown on the far left side of the image refract incident light appreciably, and thus when looking through them, the view appears quite blurry.  I was able to see clearly through the other three pairs, so the thick positive spherical lens pair served as an outlier case.

Lenses

I traced out the shape of each of the lenses onto the two cardboard wheels with a pencil, such that the center of each lens was 4 centimeters from the rim of the wheel.  Shown below is a picture of my tracings on the wheels.  Scissors were used to pierce through the center of these marked regions and cut the shapes out.  Additionally, I cut out the shape of the largest of my lenses, the spherical meniscus, in two locations on a cardboard box for viewing windows of the ghost image.

Traced Lenses

Prior to fixing the lenses in place, I cleaned them with rubbing alcohol, rinsed them off with water, and then dried them with wipers.  A hot glue gun was used to securely mount the lenses on the wheels.  A picture of the two wheels with lenses attached is given below.

Phoropter

With the phoropter constructed, I next needed to make the Pepper’s Ghost illusion and position the wheels around the viewing windows I established.  I used a cardboard box to house the object and piece of acrylic needed for the illusion.  Two small holes were cut through the box in the locations where the center of each wheel was to be placed; small holes were also cut through the center of each wheel, as seen in the above picture of the wheels with lenses glued on.  Two large screws were pushed through the small holes on the box and the wheels.  Below is a picture of the phoropter mounted to the box.

Outisde box

Duct tape held the acrylic piece steady inside the box.  The object selected to produce the ghost image was a desk clock.  A clock was chosen because it provided the subject a means of discerning information.  The visual challenge was to look through the phoropter at the ghost image and tell the time, based on the locations of the second, minute, and hour hands of the clock.  The overhead view of the components inside the box is seen below.

Overhead

In order to clearly see Pepper’s Ghost with my system, the lights were turned off and an LED light bulb was placed overhead the piece of acrylic as an illumination source.  Two shots through two different lens pairs are illustrated below.  The first is through the thick positive spherical lenses and appears blurry and unclear; the view through the right lens is the actual clock.  The second is through the spherical meniscus lenses, and the ghost image of the clock is discernible through the left lens.  The time on the actual clock is 11:01 with the red second hand on second 42; of course, since the ghost image is a reflection, it is inverted to look like the time is 12:59 with the second hand on second 18.

Blurry image

Clear image

Inventing the Impossible: Storytelling Tips from Cyber Illusionist Marco Tempest

Inventing the Impossible: Storytelling Tips from Cyber Illusionist Marco Tempest

Inventing the Impossible: Storytelling Tips from Cyber Illusionist Marco Tempest

MarcoTempest headshot

Cyber illusionist Marco Tempest uses technology to “invent the impossible.” His unique blend of science, tech, and magic creates one-of-a-kind experiences—most recently, a dancing swarm of twenty-four drones. The power of his illusions comes from the way they tease our imaginations into believing that we are seeing something just beyond what we think we know can be real. As Marco puts it, “Magic makes possible today what science will make tomorrow.”

His interest in technology has inspired several hit talks at TED, and his creative approach is instructive for both aspiring magicians and those of us whose daily lives are firmly grounded in reality. His work reveals the power of persuasion and the value of keeping your imagination open to any inspiration.

In order to create a successful illusion, Marco emphasizes the importance of creating a believable story for the audience. “Once that story is embedded in the mind it’s difficult to change, and that makes it difficult for the audience to discover the secret of the trick,” he explains. “Magic, at its core, is about storytelling.

“Every magician will tell you about spectators they have met who have told them about the tricks that other magicians have performed. And all those tricks seem utterly impossible. That’s because the way the stories have been remembered, with all the vital details missing, they are impossible. The magician created a story that is difficult to unpick. Magicians are unreliable narrators, and audiences equally unreliable witnesses. But that’s what makes the magic a moment to remember.”

Image-1-39

Marco started by learning classic tricks like the Cup and Ball that remain effective a thousand years after they were created because their stories still work. Once Marco learned the foundational tricks, he began to put his own spin on them. He believes it’s important to deeply study your craft—in his case, not only magic tricks and new technologies, but also the psychology of an audience. He had to learn how to build anticipation in audiences in order to figure out how to subvert their expectations.

Marco keeps his mind open when he is brainstorming new illusions and starts with the creative vision rather than focusing narrowly on what may be technically feasible. “Sometimes an idea occurs and I have no idea what technology will make it possible,” he says. “At that stage all I have in mind is the type of effect I want to do. Then begins a long research process of technologies old and new.”

This approach may not yield immediate solutions, but it’s important not to get frustrated or give up too soon. “Not every problem has a solution, at least not a perfect one,” he says. “When you hit a creative barrier, whether you are an artist or technologist, it is too easy to give up and start something new. Instead of giving up, lay it aside. Do something different. But keep those notes and those thoughts and an eye on the territory you are interested in.”

Marco says his best ideas for illusions often come when he least expects it. And he considers staying on top of the latest technology to be a part of his job, both so that he can keep his act fresh, and to push the boundaries of how we relate to our technology. “Technologists solve practical problems but often don’t realize how the technologies they develop will impact upon society,” he says. “It is the user who takes that technology and uses it in totally unforeseen and creative ways. Human behavior changes everything.”

The Future of StoryTelling (FoST) explores how storytelling is evolving in the digital age. http://www.fost.org

Source:

Adobe Voice & Slate Blog

Visual Effects

By recording video in the overhead camera position, also referred to as the bird’s-eye view, I achieved a visual illusion featuring two actors who seem to defy gravity and temporarily float in air.  The video is shown below.


The video features two wizards dueling with magical wands.  Throughout the action sequence, both wizards perform a levitation spell that portrays his opponent to be suspended in mid-air with his feet removed from the apparent ground.  In actuality, the actors are laying on the floor with their feet against a wall (the apparent ground), allowing each to simply remove his feet from the wall when his opponent launches a successful attack.  A camera operator is standing on top of a tall ladder, approximately six feet from the ground to film the overhead view.  The height from which the scene was filmed was a crucial aspect, as beginning film takes demonstrated that shorter ladders, such as those only two or three feet tall, did not enable a large enough space to be visible with the camera.

Avidemux was used for video editing and Kdenlive was just used to add audio to the edited video.  I carried out editing with two separate programs because for some odd reason Avidemux did not allow me to insert audio; although, Avidemux has the capability of running audio and video together.  During filming, there was a point in which the wizard on the right-hand side pushed his feet off against the wall in a jumping motion.  He then rose from the ground and walked over to the left side of his opponent, laying down again in an upside down fashion with respect to the camera’s view, before casting a final levitation spell.  Editing with Avidemux was done to facilitate the appearance of a surprise attack.  After the jumping motion, I removed video content up to the point in which the wizard on the right-hand side was completely off the screen.  I then kept eight frames of the wizard off screen; when watched right after the jumping motion, it appears that the wizard has vanished.  I then cut out all video content from that point to the point in which the wizard has established his new position behind his foe, so that it appears that the wizard vanishes and instantly reappears ready to attack.  With Kdenlive I added music played with a harp to complement the gentle nature of levitation.

Having never directed a video before, I became aware that it is quite difficult to verbally communicate an action sequence in a way that everyone involved can fully understand.  Although I had written out a script, it was suggested to me that I make a series of drawings to distinctly highlight each individual step in the sequence.  Implementing this new approach proved successful and enabled the actors to practice the choreography in a less hesitant manner.

Visual Effects and Animation

For this week’s project I did a composite of live film and an animated character. This character is a chicken that I had previously created in Autodesk Maya. To create the chicken I started with a full-scale character design picture, which I uploaded into Maya to use as reference while I modeled it with polygons. After modeling the character by taking basic shapes like spheres and stitching them together, I rigged the character (implemented a skeleton with joints) and shaded it.

To composite the video I first filmed myself running around, imagining the chicken chasing me. To stabilize this video I learned that Youtube actually has a stabilizing button which performs the stabilization for free just by uploading and editing through youtube. After stabilizing, I downloaded the video and exported this .mov file into a sequence of Tiff images (using Premiere) to import into Maya. After this I created a new camera object that pointed at an image plane that played the sequential tiff images so I could overlay my character on top. Finally I animated my chicken, lit the scene and rendered; adding sound back into this new composited video.

Some bumps I ran into included animating the chicken to appear as if it came out of the computer. Originally I wanted to animate the chicken out of the computer, but this proved more difficult than I imagined, so I used a particle effect explosion. I originally wanted this puff of smoke to be white, however I found in order for it to shine white I needed a light to shine on it, which would in turn shine on the chicken, making it way too bright. So I decided to make the smoke black to avoid blowing out the chicken.

Some adjustments I would like to make for the future include maybe some textures for my chicken and maybe some better lighting for more accurate shadows. I would also like to turn the smoke white, and try and animate the chicken as if it were coming out of the computer screen.

Visual Effects

Video Recipe:

Ingredients:

  • Camera
  • Tripod (very important!)
  • cutting board, knife, fruits/vegetables
  • Printed image of a strawberry
  • 2 helpful friends
  • Adobe Primier Pro

How it’s done:

  • Set the camera on the tripod and make sure it’s not moving.
  • One of the helpful friends is responsible for clicking the record/pause button on the camera.
  • Start recording, when a magic need to happen, tell the friend to pause the camera, while the other helpful friend is responsible for replacing the objects in the frame.
  • It is very important that someone else will swap the changing objects, so you move your hands as little as possible between each shot.
  • After all the recordings are done, choose you favourite editing software to cut, connect and insert audio.
  • I used Adobe Premier, and there are many tutorials for that online.
  • I also speeded most video parts to play at X2 speed, and added music I found on the free music archive.
  • To hide the video cuts, which were very noticeable, I added the “ding” sound on each switch.
  • I changed the strawberries color using the “paint bucket” effect in Premiere, described here

Bon appetit!

Artificial Moonlight

Inspiration for this work came from reading the fantastical books by J.R.R. Tolkien. In several of these books, including The Hobbit and The Lord of the Rings: The Fellowship of the Ring, moonlight reveals hidden doors that are not visible with ordinary sunlight. Thus, I desired to discover how moonlight was physically distinct from sunlight. Literature concerning this topic describes that moonlight consists largely of sunlight reflected off the Moon’s surface, in addition to some minor sources like starlight. It has a lower intensity than sunlight and looks bluish to humans; the blue hue is attributed to the Purkinje effect. To gain insight into how to reproduce moonlight artificially, I implemented a twofold approach. The first part dealt with creating a software program that applied image processing on an input image of an outdoor scene cast in natural sunlight to produce an output image of the same scene in moonlight. In the second part, I built a rudimentary LED flashlight with a moonlight mode using a function generator.

Photographers are able to manipulate their camera settings to make images taken in natural sunlight exhibit the appearance of moonlit scenes. Utilizing many of these same techniques, I wrote a program in Matlab to accomplish this goal. The code for this program can be found at the following link (open with Notepad to see it easily):

https://www.dropbox.com/s/6anvqehn9rx8tio/Moonlight.m?dl=0

First, the images were white balanced; this affected the warmth and coolness of colors in the image. Next, the saturation was decreased to half of its original value, as moonlit scenes are less bright than sunlit ones. Finally, the contrast was increased to widen the difference between low and high pixel intensities. Using the default values for white balancing, calculated from averaging the RGB values, the resultant images were too bright. To remedy this, the white balancing was decreased. Two pairs of images in sunlight (original) and moonlight (calculated from program) are given below. The first pair shows an outdoor scene with a far depth of field, while the second has a near depth of field.

Alberta

Alberta Moonlight


Arwen

Arwen Moonlight

Many LED flashlights have a moonlight setting that is noticeably dimmer than the normal bright mode. I made my own form of this type of light source using a 10V peak-to-peak function generator and a strip of 12V LEDs. I set the frequency to 1 kHz and selected the square wave option. To start, I applied a high peak-to-peak voltage of approximately 9.4V to simulate sunlight. Next, I gradually decreased the voltage on the function generator, dimming the LEDs. Comparing a photograph of moonlight with the intensity of the LED strips, it was determined that a peak-to-peak voltage of 7.2V yielded a luster akin to moonlight. Photographs of the LEDs with an applied voltage of 9.4V peak-to peak (top) and an applied voltage of 7.2V peak-to-peak (bottom) are illustrated below.

ArtificialSun

ArtificialMoon