Main.Team3NetworkedWearable History
Hide minor edits - Show changes to markup
(:youtube A--drWW6AHc width=560 height=340 scale=1:)
We originally sewed all of the electronic components into the helmet head straps. This would have made for robust design even if the construction hat was hit. We found, however, that the resistance of the thread was too high and the battery voltage dropped an unacceptable amount before reaching the motors and the arduino. Therefore we switched to the conductive tape version featured above.
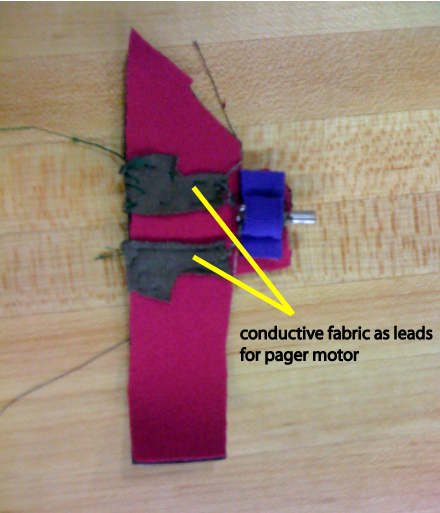
Other construction features of note are the way we connected the pager motor to the rest of the assembly. The pager motor vibration poses particular problems for most solder joints and epoxies as the connection may eventually fail from fatigue. The specific mounting used in this project features threaded connections between motor and conductive fabric which are held in place by solder acting as beads on either side of the motor leads. The choice of neoprene fabrice was not accidental and the fabric absorbs the vibration enough that the module can be taped to the helmet.
We originally sewed all of the electronic components into the helmet head straps. This would have made for robust design even if the construction hat was hit. We found, however, that the resistance of the thread was too high and the battery voltage dropped an unacceptable amount before reaching the motors and the arduino. Therefore we switched to the conductive tape version featured above.
Other construction features of note are the way we connected the pager motor to the rest of the assembly. The pager motor vibration poses particular problems for most solder joints and epoxies as the connection may eventually fail from fatigue. The specific mounting used in this project features threaded connections between motor and conductive fabric which are held in place by solder acting as beads on either side of the motor leads. The choice of neoprene fabrice was not accidental and the fabric absorbs the vibration enough that the module can be taped to the helmet.
We have provided two sample codes to turn on and off the servo motor and the pager motor.
We have provided two sample codes to turn on and off the servo motor and the pager motor.
monospaced
Notes on Construction
We originally sewed all of the electronic components into the helmet head straps. This would have made for robust design even if the construction hat was hit. We found, however, that the resistance of the thread was too high and the battery voltage dropped an unacceptable amount before reaching the motors and the arduino. Therefore we switched to the conductive tape version featured above.
Other construction features of note are the way we connected the pager motor to the rest of the assembly. The pager motor vibration poses particular problems for most solder joints and epoxies as the connection may eventually fail from fatigue. The specific mounting used in this project features threaded connections between motor and conductive fabric which are held in place by solder acting as beads on either side of the motor leads. The choice of neoprene fabrice was not accidental and the fabric absorbs the vibration enough that the module can be taped to the helmet.
We have provided two sample codes to turn on and off the servo motor and the pager motor.
- Arduino: We're using a Lilypad Arduino, which has sewable leads-- ideal for wearable devices
- Arduino: We're using a Lilypad Arduino, which has sewable leads-- ideal for wearable devices
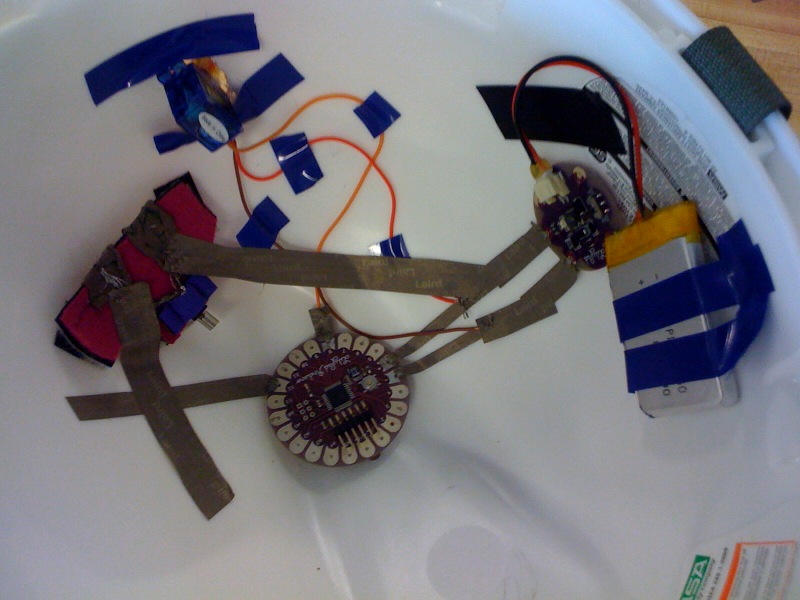
Inside of the helmet
Need a spidey sense? You've got it! Need to get out fast? Fly!
This hat has it all. A sidekick can give your spidey sense a jump start or your distressed citizens can help you locate them with the awesome "Save Me" (c) application. Snap in your helmet and go go gadget wings!
Need a spidey sense? You've got it! Need to get out fast? Fly!
This hat has it all. A sidekick can give your spidey sense a jump start or your distressed citizens can help you locate them with the awesome "Save Me" (c) application. Snap in your helmet and go go gadget wings!
- A "Spidey Sense" implemented as a pager module
- A "Spidey Sense" implemented as a pager module
- A "Fly Module" implemented as an aerodynamically modified servo motor
- A "Fly Module" implemented as an aerodynamically modified servo motor
- Arduino: We're using a Lilypad Arduino, which has sewable leads-- ideal for wearable devices
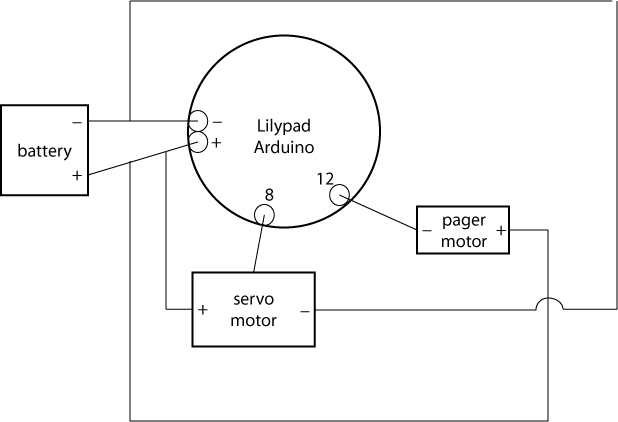
- Battery: We used a rechargeable 3.3v battery connected to a circuit that outputs 5v to power the Lilypad and motors. It's essential for there to be a good connection (low parasitic resistance) between the battery leads and the power of the Lilypad.
- Bluetooth: The bluetooth module, which connects to the Lilypad, allows the Arduino to talk with the Android using the Amorino Library
- Wearable: We attached all our components to the inside of a construction helmet using stick-on velcro and conductive tape to connect the circuitry. Helmets has built-in room on the top, which never touches a wearer's head.
Inside of the helmet
- Arduino: We're using a Lilypad Arduino, which has sewable leads-- ideal for wearable devices
- Battery: We used a rechargeable 3.3v battery connected to a circuit that outputs 5v to power the Lilypad and motors. It's essential for there to be a good connection (low parasitic resistance) between the battery leads and the power of the Lilypad.
- Bluetooth: The bluetooth module, which connects to the Lilypad, allows the Arduino to talk with the Android using the Amorino Library
- Wearable: We attached all our components to the inside of a construction helmet using stick-on velcro and conductive tape to connect the circuitry. Helmets has built-in room on the top, which never touches a wearer's head.
Inside of the helmet
Construction
The hat has two output modules:
Output Modules
Other modules:
- Battery
- Arduino
- Bluetooth
- Wearable
Other Modules
- Arduino: We're using a Lilypad Arduino, which has sewable leads-- ideal for wearable devices
- Battery: We used a rechargeable 3.3v battery connected to a circuit that outputs 5v to power the Lilypad and motors. It's essential for there to be a good connection (low parasitic resistance) between the battery leads and the power of the Lilypad.
- Bluetooth: The bluetooth module, which connects to the Lilypad, allows the Arduino to talk with the Android using the Amorino Library
- Wearable: We attached all our components to the inside of a construction helmet using stick-on velcro and conductive tape to connect the circuitry. Helmets has built-in room on the top, which never touches a wearer's head.
Inside of the helmet

Current Idea:
This hat has it all. A sidekick can give your spidey sense a jump start or your distressed citizens can help you locate them with the awesome "Save Me" (c) application. Snap in your helmet and go go gadget wings! The wing module also doubles as an input device for you to communicate with your home base. All this in a hat!
This hat has it all. A sidekick can give your spidey sense a jump start or your distressed citizens can help you locate them with the awesome "Save Me" (c) application. Snap in your helmet and go go gadget wings!
http://newtextiles.media.mit.edu/uploads/Main/Pager.jpg
Circuit Diagram
http://newtextiles.media.mit.edu/uploads/P/Pager.jpg
http://newtextiles.media.mit.edu/uploads/Main/Pager.jpg
http://newtextiles.media.mit.edu/uploads/P/Pager.jpg

@@// Sweep
// Sweep
monospaced
@@ int pager = 12; // pager connects to pin 12
@@int pager = 12; // pager connects to pin 12
} @@
@@ // Sweep
}@@
@@// Sweep
} @@
} @@
The hat has two output modules:
- A "Spidey Sense" implemented as a pager module
- A "Fly Module" implemented as an aerodynamically modified servo motor
Other modules:
- Battery
- Arduino
- Bluetooth
- Wearable
Sample Code
@@ int pager = 12; // pager connects to pin 12 int led = 13; // LED for debugging
void setup() {
  pinMode(pager, OUTPUT);
  pinMode(led, OUTPUT);
}
void loop() {
  digitalWrite(pager, LOW);      // pager turns on when its pin is LOW
  digitalWrite(led, HIGH);
  delay(2000);
  digitalWrite(pager, HIGH);    // pager turns off when its pin is HIGH
  digitalWrite(led, LOW);
  delay(2000);
} @@
@@ // Sweep // by BARRAGAN <http://barraganstudio.com>
- include <Servo.h>
Servo myservo; // create servo object to control a servo
// a maximum of eight servo objects can be created
int pos = 0; // variable to store the servo position
int servo = 8; // servo control attaches to pin 8 int led = 13; // LED for debuggins
void setup() {
  pinMode(servo, OUTPUT);
  pinMode(led, OUTPUT);
  myservo.attach(servo);  // attaches the servo on pin 9 to the servo object
}
void loop() {
  digitalWrite(13, HIGH);
  for(pos = 0; pos < 100; pos += 1)  // goes from 0 degrees to 180 degrees
  {                                  // in steps of 1 degree
    myservo.write(pos);              // tell servo to go to position in variable 'pos'
    delay(50);                       // waits 15ms for the servo to reach the position
  }
  digitalWrite(13, LOW);
  for(pos = 100; pos>=1; pos-=1)     // goes from 180 degrees to 0 degrees
  {
    myservo.write(pos);              // tell servo to go to position in variable 'pos'
    delay(50);                       // waits 15ms for the servo to reach the position
  }
} @@
This hat has it all. A sidekick can give your spidey sense a jump start or your distressed citizens can help you locate them with the awesome "Save Me" (c) application. Snap in your helmet and go go gadget wings! The wing module also doubles as an input device for you to communicate with your home base. All this in hat!
This hat has it all. A sidekick can give your spidey sense a jump start or your distressed citizens can help you locate them with the awesome "Save Me" (c) application. Snap in your helmet and go go gadget wings! The wing module also doubles as an input device for you to communicate with your home base. All this in a hat!
++Heroic Hat++
Heroic Hat
+Construction+
~Sarah B
Construction
Hi all,
Sorry I missed meeting you today. I just thought I would activate this space as a way to organize our work if desired. Please feel free to use :)
Current Idea:
++Heroic Hat++
Need a spidey sense? You've got it! Need to get out fast? Fly!
This hat has it all. A sidekick can give your spidey sense a jump start or your distressed citizens can help you locate them with the awesome "Save Me" (c) application. Snap in your helmet and go go gadget wings! The wing module also doubles as an input device for you to communicate with your home base. All this in hat!
+Construction+
Hi all,
Sorry I missed meeting you today. I just thought I would activate this space as a way to organize our work if desired. Please feel free to use :)
~Sarah B