Main.SensingTouch History
Hide minor edits - Show changes to markup
- Coding for Arduino on the scapacitive sensor requires use of the wire libary in Arduino. This source was very helpful to understand some of what was happening.The link also contains a second link to the code that Leah cleaned up. http://interactive-matter.org/2009/07/arduino-ad7746/\\
- Coding for Arduino on the capacitive sensor requires use of the wire libary in Arduino. This source was very helpful to understand some of what was happening.The link also contains a second link to the code that Leah cleaned up. http://interactive-matter.org/2009/07/arduino-ad7746/\\
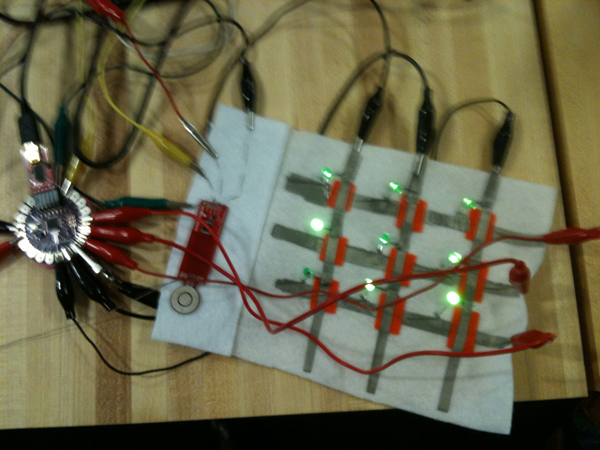
Here is the final curtain panel, open.
Here is the final curtain panel, open.
\\

Here is the final curtain panel, open.
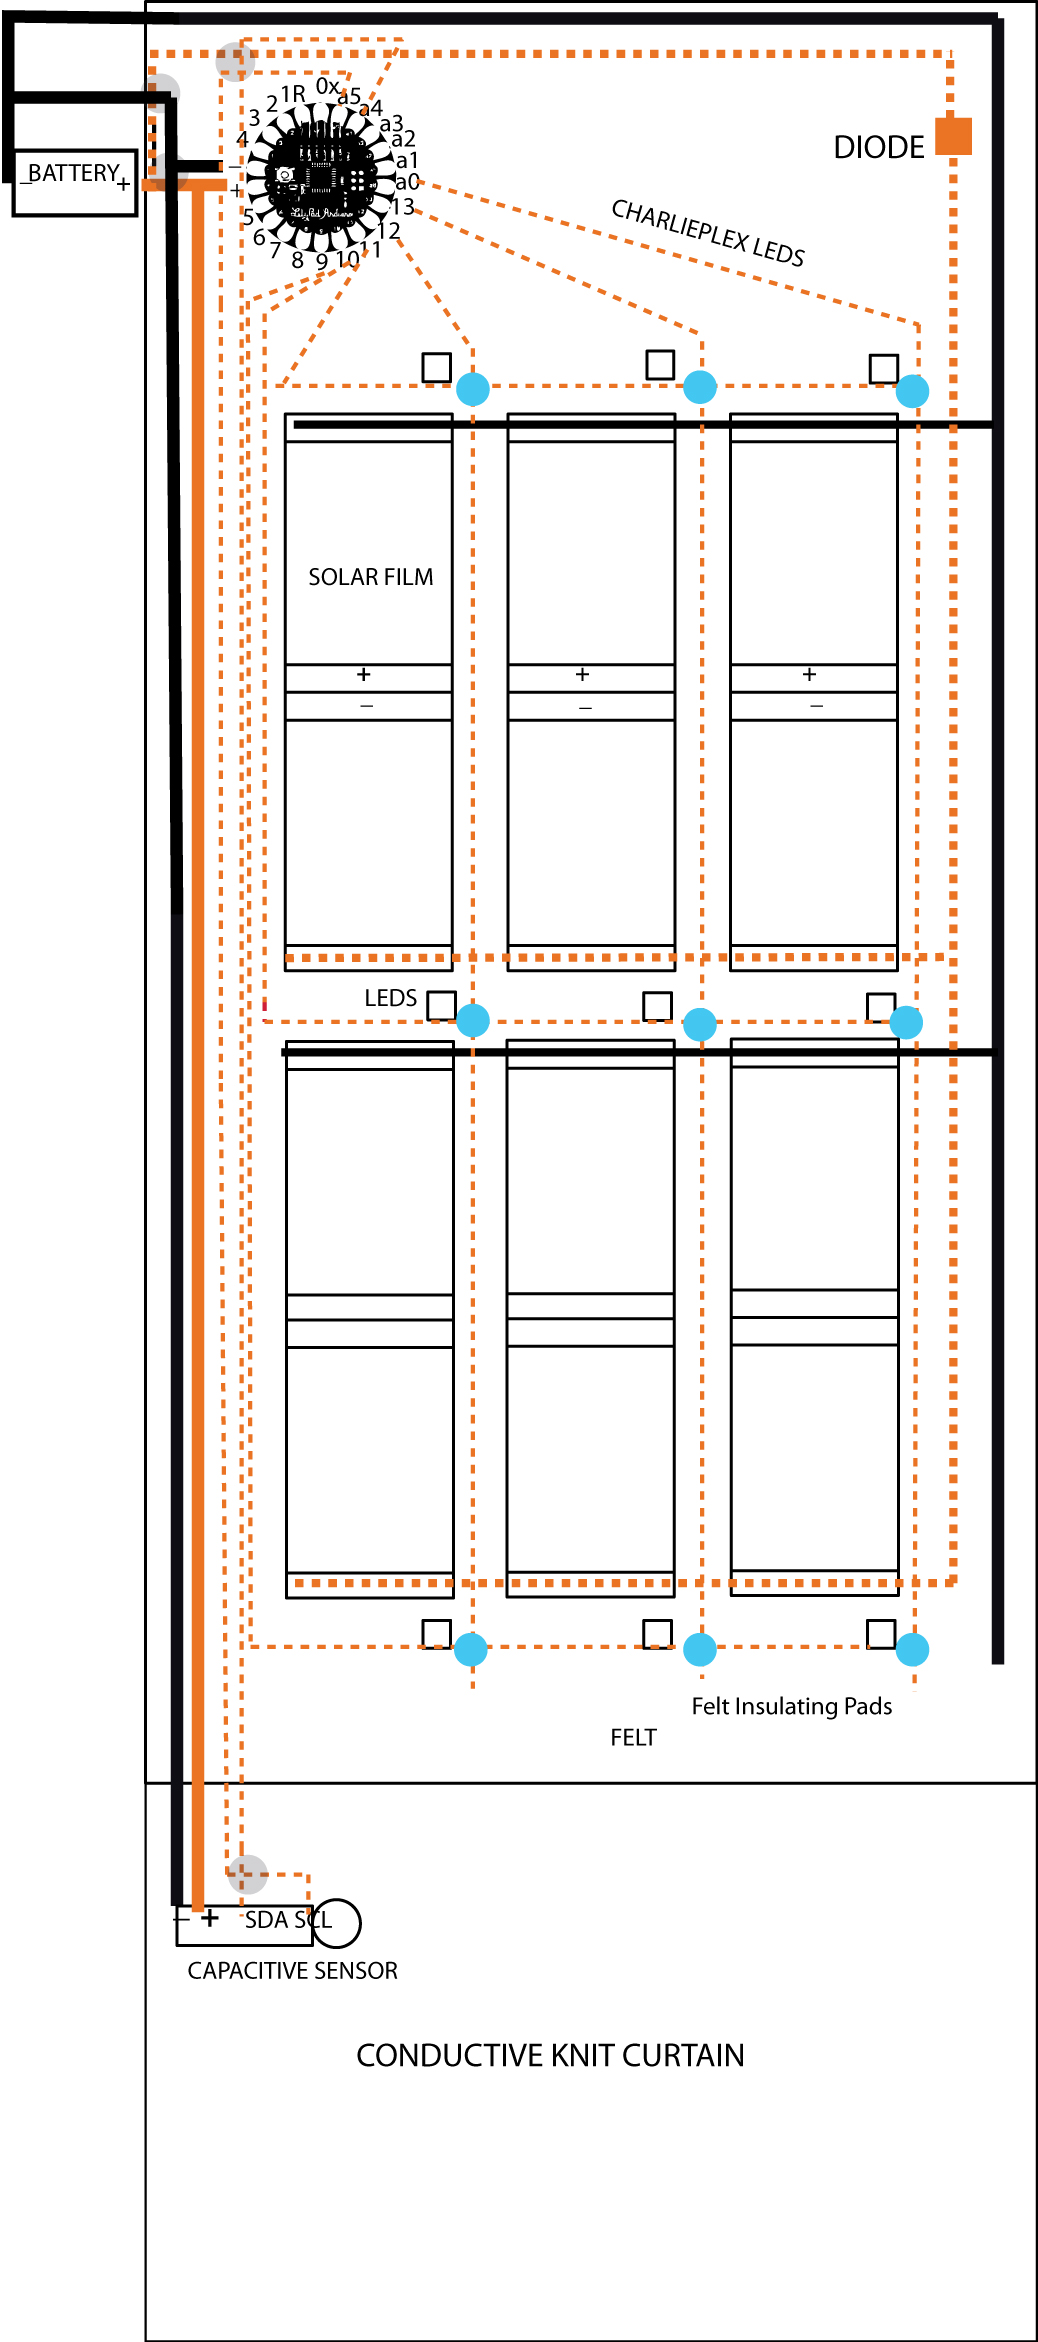 \\
\\ Here is a drawing that shows the basic layout of the circuits.\\
Here is a drawing that shows the basic layout of the circuits.
\\\\
DESCRIPTION
DESCRIPTION
This project is a touch sensitive curtain that provides its own power through solar film strips on the cover of the curtain panel. The curtain is made of knitted conductive thread, that is connected to a capacitive sensor that can read human nearness and touch. As a way to read this nearness or touch, I have used LED's that are programmed to be active at different values read by the sensor. These values were set to read, close by, at 4 inches, close at 1/4 inch and touching. \\
This project is a touch sensitive curtain that provides its own power through solar film strips on the cover of the curtain panel. The curtain is made of knitted conductive thread, that is connected to a capacitive sensor that can read human nearness and touch. As a way to read this nearness or touch, I have used LED's that are programmed to be active at different values read by the sensor. These values were set to read, close by, at 4 inches, close at 1/4 inch and touching. \\
PROCESS
The curtain is made active by three circuits, the first is the solar circuit with diode to direct the juice gathered from the solar film to the battery. The diode prevents the gathered energy from going back into the solar film.
PROCESS
The curtain is made active by three circuits, the first is the solar circuit with diode to direct the juice gathered from the solar film to the battery. The diode prevents the gathered energy from going back into the solar film.
\\
 \\
\\\\
\\

\\
\\- Should figure a way to use insulated fabric or have tried dipping threads in some insulating material. The curtain 'top' is very thick because the layers of felt were used to separate circuitry.\\
- Should figure a way to use insulated fabric or have tried dipping threads in some insulating material. The curtain 'top' is very thick because four layers of felt were used to separate circuitry.\\
- Should figure a way to use insulated fabric or have tried dipping threads in some insulating material. The curtain 'top' is very thick because the layers of felt were used to separate circuitry.\\
- Should figure a way to use insulated fabric or have tried dipping threads in some insulating material. The curtain 'top' is very thick because the layers of felt were used to separate circuitry.\\
- Coding for Arduino on the scapacitive sensor requires use of the wire libary in Arduino. This source was very helpful to understand some of what was happening.The link also contains a second link to the code that Leah cleaned up. http://interactive-matter.org/2009/07/arduino-ad7746/\\
- Coding for Arduino on the scapacitive sensor requires use of the wire libary in Arduino. This source was very helpful to understand some of what was happening.The link also contains a second link to the code that Leah cleaned up. http://interactive-matter.org/2009/07/arduino-ad7746/\\
- Coding for Arduino on the scapacitive sensor requires use of the wire libary in Arduino. This source was very helpful to understand some of what was happening.The link also contains a second link to the code that Leah cleaned up. \\
- Coding for Arduino on the scapacitive sensor requires use of the wire libary in Arduino. This source was very helpful to understand some of what was happening.The link also contains a second link to the code that Leah cleaned up. http://interactive-matter.org/2009/07/arduino-ad7746/\\
\\Here is my prototype.\\
Here is my prototype.\\
\\ \\
\\Here is my prototype.
\\Here is my prototype.
\\ [+LESSONS LEARNED=]
LESSONS LEARNED
- Prototype was sooo critical to this study, and each piece had to be tested, piece by piece. The final curtain had to be equally tested part by part to ensure nothing was going to go up in flames.
\\Here is my prototype.
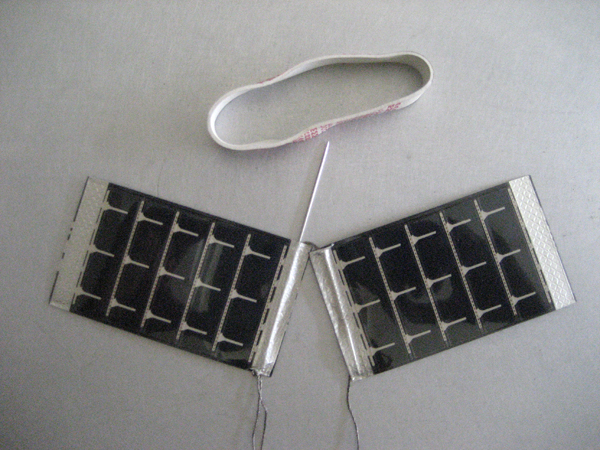
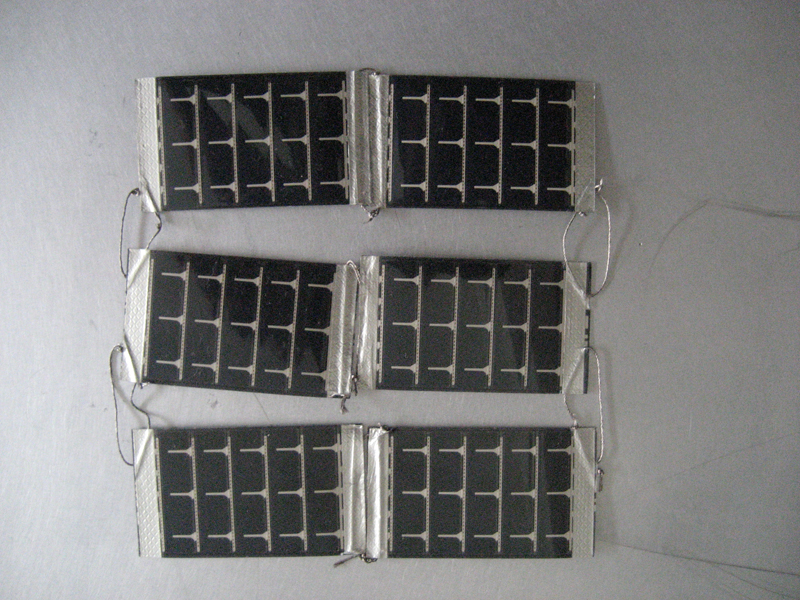
First two strip were sewn as a series, plus to minus. The series were then sewn as parallel clusters. Note the rubber band used to pull needle through the glue between film and metal strip. This array yielded 8 volts of power out of doors in sunlight.\\
First two strip were sewn as a series, plus to minus. The series were then sewn as parallel clusters. Note the rubber band used to pull needle through the glue between the plastic film and metal strip. This array yielded 8 volts of power out of doors in sunlight.\\
- Coding for Arduino on the scapacitive sensor requires use of the wire libary in Arduino. This source was very helpful to understand some of what was happening.
- Here is another Arduino tutorial on Capacitive Sensing using foil and wire. A home made sensor.http://www.arduino.cc/playground/Main/CapSense
- Coding for Arduino on the scapacitive sensor requires use of the wire libary in Arduino. This source was very helpful to understand some of what was happening.The link also contains a second link to the code that Leah cleaned up.
- Here is another Arduino tutorial on Capacitive Sensing using foil and wire. A home made sensor.http://www.arduino.cc/playground/Main/CapSense
\\
- Coding for Arduino on the sensor requires wire libary in Arduino. This source was very helpful to understand some of what was happening.
- Coding for Arduino on the scapacitive sensor requires use of the wire libary in Arduino. This source was very helpful to understand some of what was happening.
- Here is another Arduino tutorial on Capacitive Sensing using foil and wire. A home made sensor.http://www.arduino.cc/playground/Main/CapSense
[+LESSONS LEARNED=]
- Should figure a way to use insulated fabric or have tried dipping threads in some insulating material. The curtain 'top' is very thick because the layers of felt were used to separate circuitry.
* Coding for Arduino on the sensor requires wire libary in Arduino. This source was very helpful to understand some of what was happening.
Basically if you open up your 'Serial Monitor' in Arduino then you can see the sensor values. The sensor is a bit jumpy and the values change from space to space, and change depending on what kind of surface you are working on. //
Basically if you open up your 'Serial Monitor' in Arduino then you can see the sensor values. The sensor is a bit jumpy and the values change from space to space, and change depending on what kind of surface you are working on. The values also change if the cover is open or closed on the circuitry //
The combined code basically picks four 'less than' values that the sensor is showing, and for each range sets a pattern. In the video my patterns happen very fast because I set the time in the code pretty fast.
The combined code basically picks four 'less than' values that the sensor is showing, and for each range sets a pattern. In the video my patterns happen very fast because I set the time in the code pretty fast.
Attach:Sensing%20Curtain%20Code.pdf
\\
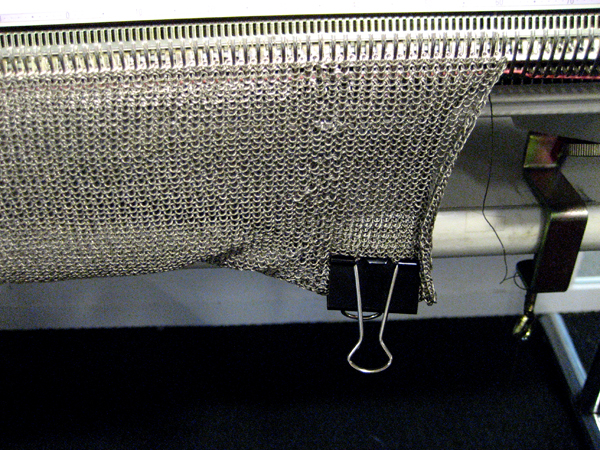
The curtain was knitted with the 4ohm/inch conductive thread on the knitting machine with the lace carriage. The carriage dial was set to 'O' and the tension on the dial set to 3.5 for the very small diameter conductive yarn. The cast on was run as if it were a lace cast on (see machine booklet). The pink nylon thread was kept in the entire time on this one. To keep the yarn from jumping off, and to keep machine from dropping stitches, success was met after traveling very, very slowly with the carriage, and not using the weights. The weights tore holes in the knit and made it skip needles. Holding it with my hand as the carriage went by, and with clips seemed to work. The last thread after cast off needs to be kept long because that is what connects to the sensor.
The curtain was knitted with the 4ohm/inch conductive thread on the knitting machine with the lace carriage. The carriage dial was set to 'O' and the tension on the dial set to 3.5 for the very small diameter conductive yarn. The cast on was run as if it were a lace cast on (see machine booklet). The pink nylon thread was kept in the entire time on this one. To keep the yarn from jumping off, and to keep machine from dropping stitches, success was met after traveling very, very slowly with the carriage, and not using the weights. The weights tore holes in the knit and made it skip needles. Holding it with my hand as the carriage went by, and with clips seemed to work. The last thread after cast off needs to be kept long because that is what connects to the sensor channel.
Sensor and Charlieplex Programming in Arduino
The charlieplex program and the sensor program were written separately and then combined. The charlieplex program is similar to the one used in the Hello USA Networked Wearble Shirt for Team 6. The sensor program was refined by Leah after looking at the spec sheets for the AD7746 from Sparkfun. Here is the combined program.
Basically if you open up your 'Serial Monitor' in Arduino then you can see the sensor values. The sensor is a bit jumpy and the values change from space to space, and change depending on what kind of surface you are working on. //
The combined code basically picks four 'less than' values that the sensor is showing, and for each range sets a pattern. In the video my patterns happen very fast because I set the time in the code pretty fast.
\\
[Solar Film Strips]
 \\\\\\
\\
\\
\\
[Knit Machine]
First two strip were sewn as a series, plus to minus. The series were then sewn as parallel clusters. This array yielded 8 volts of power out of doors in sunlight.\\
First two strip were sewn as a series, plus to minus. The series were then sewn as parallel clusters. Note the rubber band used to pull needle through the glue between film and metal strip. This array yielded 8 volts of power out of doors in sunlight.\\
Knitted Conductive Curtain
The curtain was knitted with the 4ohm/inch conductive thread on the knitting machine with the lace carriage. The carriage dial was set to 'O' and the tension on the dial set to 3.5 for the very small diameter conductive yarn. The cast on was run as if it were a lace cast on (see machine booklet). The pink nylon thread was kept in the entire time on this one. To keep the yarn from jumping off, and to keep machine from dropping stitches, success was met after traveling very, very slowly with the carriage, and not using the weights. The weights tore holes in the knit and made it skip needles. Holding it with my hand as the carriage went by, and with clips seemed to work. The last thread after cast off needs to be kept long because that is what connects to the sensor.
\\ ""Solar Array'"\\
Solar Array\\
Solar Array\\
""Solar Array'"\\
'"Solar Array'"\\
Solar Array\\
Solar Array\\
'"Solar Array'"\\
'Felecia Davis'
Felecia Davis
""Solar Array""
Solar Array\\
'Felecia Davis'
""Solar Array""
\\
\\\\ Brief Description
DESCRIPTION
Process
PROCESS
\\
Components
COMPONENTS
Attach:
First two strip were sewn as a series, plus to minus.
First two strip were sewn as a series, plus to minus. The series were then sewn as parallel clusters. This array yielded 8 volts of power out of doors in sunlight.
Attach:
Components
The solar film was sewn with conductive threads between the plastic film and the metal strip that is the conductor.
First two strip were sewn as a series, plus to minus.
[Circuit Drawing]
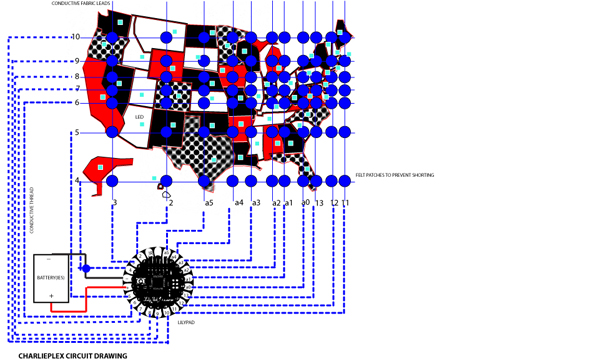
The curtain is made active by three circuits, the first is the solar circuit with diode to direct the juice gathered from the solar film to the battery. The diode prevents the gathered energy from going back into the solar film.
The curtain is made active by three circuits, the first is the solar circuit with diode to direct the juice gathered from the solar film to the battery. The diode prevents the gathered energy from going back into the solar film.
\\
\\
SENSING TOUCH CURTAIN
SENSING TOUCH CURTAIN
This project is a touch sensitive curtain that provides its own power through solar film strips on the cover of the curtain panel. The curtain is made active by three circuits, the first is the solar circuit with diode to direct the juice gathered from the solar film to the battery. The diode prevents the gathered energy from going back into the solar film.
Brief Description
This project is a touch sensitive curtain that provides its own power through solar film strips on the cover of the curtain panel. The curtain is made of knitted conductive thread, that is connected to a capacitive sensor that can read human nearness and touch. As a way to read this nearness or touch, I have used LED's that are programmed to be active at different values read by the sensor. These values were set to read, close by, at 4 inches, close at 1/4 inch and touching.
Process
The curtain is made active by three circuits, the first is the solar circuit with diode to direct the juice gathered from the solar film to the battery. The diode prevents the gathered energy from going back into the solar film. \\
The last circuit is the
The last circuit is for the sensor it is a Capacitive Sensor AD 7746. The sensor is also controlled through the Lilypad and is connected by one channel, to the conductive knit curtain.
Here is a drawing that shows the basic layout of the circuits.
This project is a touch sensitive curtain that provides its own power through solar film strips on the cover of the curtain panel. The curtain is made active by three circuits, the first is the solar circuit with diode to direct the juice gathered from the solar film to the battery. The diode prevents the gathered energy from going back into the solar film.
The second circuit is the charlieplex circuitry made to test out different values for the sensor. This is the gridded circuit you see in the video with the panel open. This circuit is juiced through the microprocessor in the Lilypad to the chalieplexed conductive fabric. The arduino program used to turn on and off the lights, that was integrated with the circuit is included below.
The last circuit is the
SENSING TOUCH CURTAIN
SENSING TOUCH CURTAIN
(:vimeo 11816712:)
(:vimeo 11816390:)
(vimeo:11816390:)
(vimeo:11816390:) \\
//
[Other Experiments_Wind Power]
// // // //
// // // //
//
[Other Experiments_Wind Power]
SENSING TOUCH CURTAIN
SENSING TOUCH CURTAIN
Sensing Touch Curtain
SENSING TOUCH CURTAIN
Sensing Touch Curtain