Resistive Sensor
by buechley
Due: Tuesday, February 28, 2011
For this assignment you will create a soft, flexible, textile-based sensor and embed it in an Arduino project.
Part 1. Use fabric and Velostat to create a soft pressure or bend sensor. You can find a tutorial describing how to build this sensor here. Everyone should build a Velostat-based sensor. If you would like to experiment with building additional sensors, you may do that as well. Hannah Perner-Wilson’s tutorials are an excellent resource.
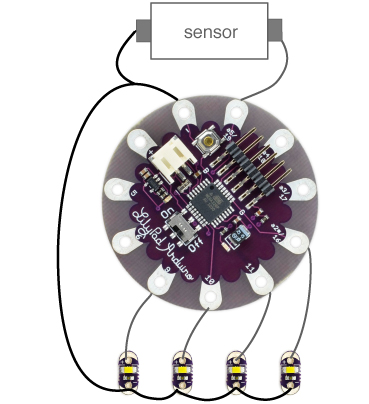
Part 2. Construct a textile project that maps your sensor input to 4 LEDs. Think about interaction scenarios and contexts that exploit the unique properties of your sensor. In your physical construction, first solder snaps to your LilyPad Simple board so that you can reuse it for future projects. Then use conductive thread to sew snaps, LEDs, and your sensor into a fabric project. Here is a diagram showing an example electrical configuration:

Download and install Arduino. Customize this Arduino Code so that it is calibrated for your sensor.
- measure the sensor’s resting and activated resistances
- calculate the voltage that you would expect to read from your sensor in its resting and activated states, using the LilyPad’s internal pullup resistor (~35K Ohms)
- measure the voltage from your sensor in its resting and activated states
Create a post (on this site) that documents your project and measurements. Make sure to add your post to the the Resistive Sensor category. Your page should include:
- a few sentences describing your project
- pictures of your work in progress
- at least one picture of your completed project
- a short video of your completed project
- a table of the electrical measurements and calculations you made
Bring your project to class on the 28th for demos!