March 02, 2010, at 10:19 PM
by 66.92.79.106 -
March 02, 2010, at 10:00 PM
by 66.92.79.106 -
Added line 9:
Deleted lines 14-63:
Fabric PCB Tutorial
supplies
illustrator file with circuit drawing
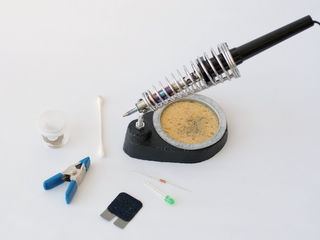
constructing: conductive fabric, backing fabric, mat knife, iron
soldering: LED, resistor, pliers, flux, clamp, soldering iron & solder
protecting: epoxy, toothpicks, binder clips, mold components
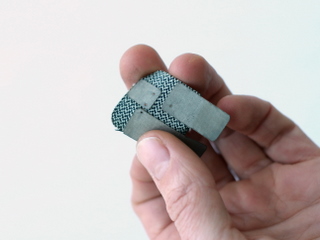
constructing a fabric PCB
step 1. (already done for you) iron a sheet of Heat-n-Bond onto a sheet of conductive fabric.
step 2. (already done for you) laser etch the circuit.
step 3. (already done for you) laser cut the backing fabric. 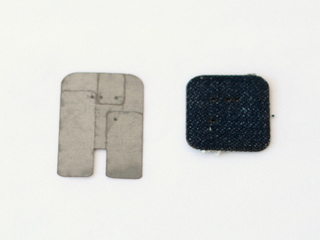 step 4. peel the paper off of the circuit only where you want it to adhere to the backing fabric.
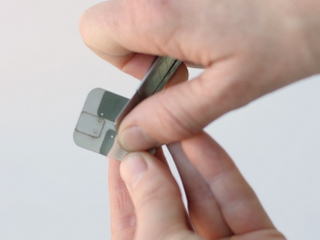
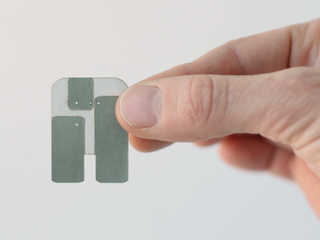 step 5. iron the circuit onto the backing fabric.
  step 6. peel the excess conductive fabric away from the backing fabric, leaving the circuit behind.
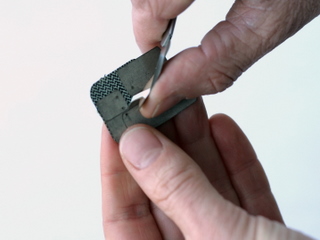
soldering a fabric PCB
step 1. bend the ends of the resistor down & insert into fabric PCB 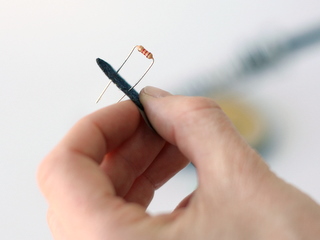 step 2. bend resistor legs out slightly and apply flux
step 3. solder resistor
watch soldering video
step 3. trim legs
step 5. insert LED with + end (anode) facing resistor
step 6. bend legs out slightly and apply flux
step 7. hold LED with clamp to solder
step 8. trim legs 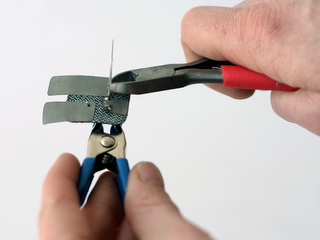
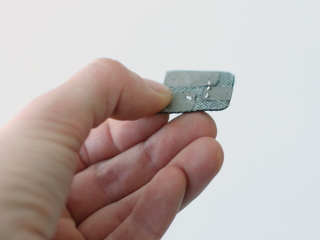 step 9. test with power supply
protecting the solder joints
step 1. clamp circuit to mold with binder clips 
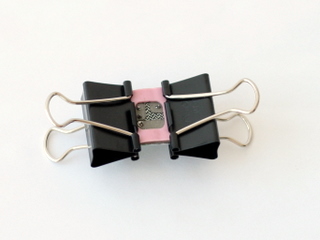 step 2. mix epoxy and pour into mold
 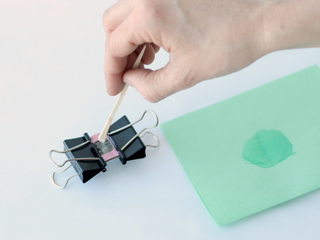 step 3. wait for epoxy to cure (approx. 10 mins)
step 4. remove circuit from mold 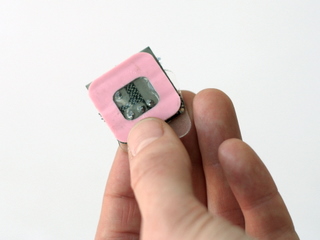
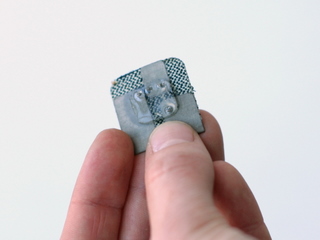
 step 8. test with power supply
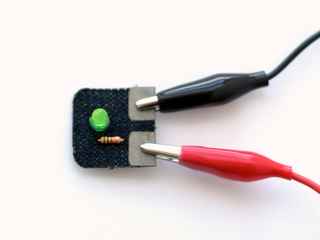
February 17, 2010, at 10:40 AM
by 18.111.95.214 -
February 17, 2010, at 10:39 AM
by 18.111.95.214 -
Added line 34:
February 17, 2010, at 10:27 AM
by 18.111.95.214 -
Changed line 43 from:
to:
watch soldering video \\\
February 17, 2010, at 10:26 AM
by 18.111.95.214 -
Changed line 43 from:
<object width="320" height="265"><param name="movie" value="http://www.youtube.com/v/hKzGrbkgggI&hl=en_US&fs=1&"></param><param name="allowFullScreen" value="true"></param><param name="allowscriptaccess" value="always"></param><embed src="http://www.youtube.com/v/hKzGrbkgggI&hl=en_US&fs=1&" type="application/x-shockwave-flash" allowscriptaccess="always" allowfullscreen="true" width="320" height="265"></embed></object> \\\
to:
February 17, 2010, at 10:25 AM
by 18.111.95.214 -
Changed lines 42-43 from:
step 3. solder resistor
step 3. trim legs
to:
step 3. solder resistor
<object width="320" height="265"><param name="movie" value="http://www.youtube.com/v/hKzGrbkgggI&hl=en_US&fs=1&"></param><param name="allowFullScreen" value="true"></param><param name="allowscriptaccess" value="always"></param><embed src="http://www.youtube.com/v/hKzGrbkgggI&hl=en_US&fs=1&" type="application/x-shockwave-flash" allowscriptaccess="always" allowfullscreen="true" width="320" height="265"></embed></object>
step 3. trim legs
February 17, 2010, at 10:17 AM
by 18.111.95.214 -
Changed lines 26-27 from:
step 2. (already done for you) laser etch the circuit.
step 3. (already done for you) laser cut the backing fabric. \\\
to:
step 2. (already done for you) laser etch the circuit.
step 3. (already done for you) laser cut the backing fabric. \\\
February 17, 2010, at 10:16 AM
by 18.111.95.214 -
Changed lines 60-61 from:
step 8. test with power supply
to:
step 8. test with power supply
February 17, 2010, at 10:01 AM
by 18.111.95.214 -
Changed lines 55-56 from:
step 2. mix epoxy and pour into mold
\\\
to:
step 2. mix epoxy and pour into mold
\\\
February 17, 2010, at 10:00 AM
by 18.111.95.214 -
Changed lines 56-58 from:
->
step 8. wait for epoxy to cure (approx. 10 mins)
step 8. test with power supply
to:
step 3. wait for epoxy to cure (approx. 10 mins)
step 4. remove circuit from mold step 8. test with power supply
February 17, 2010, at 09:58 AM
by 18.111.95.214 -
Deleted lines 52-53:
Changed line 54 from:
\\\
to:
\\\
February 17, 2010, at 09:57 AM
by 18.111.95.214 -
Changed lines 53-54 from:
step 1. clamp circuit to mold with binder clips
step 2. mix epoxy and pour into mold
to:
February 17, 2010, at 09:54 AM
by 18.111.95.214 -
Changed line 41 from:
step 2. bend resistor legs out slightly and apply flux
to:
step 2. bend resistor legs out slightly and apply flux
Changed line 49 from:
step 9. test with power supply
to:
step 9. test with power supply
February 17, 2010, at 09:53 AM
by 18.111.95.214 -
Changed line 37 from:
\\
to:
\\\
February 17, 2010, at 09:53 AM
by 18.111.95.214 -
Changed line 39 from:
step 1. bend the ends of the resistor down & insert into fabric PCB
to:
step 1. bend the ends of the resistor down & insert into fabric PCB \\\
Changed line 47 from:
to:
February 17, 2010, at 09:52 AM
by 18.111.95.214 -
Changed lines 37-38 from:
\\\
to:
Changed line 48 from:
\\\
to:
\\\
February 17, 2010, at 09:50 AM
by 18.111.95.214 -
Added lines 37-38:
->
step 1. bend the ends of the resistor down & insert into fabric PCB
Changed lines 40-44 from:
step 1. bend the ends of the resistor down & insert into fabric PCB
->
step 2. insert resistor into fabric PCB
step 3. bend resistor legs out slightly and apply flux
step 4. solder resistor
to:
step 2. bend resistor legs out slightly and apply flux
step 3. solder resistor
step 3. trim legs
Changed lines 46-48 from:
step 8. test with power supply
to:
step 8. trim legs
->
step 9. test with power supply
February 17, 2010, at 09:49 AM
by 18.111.95.214 -
Deleted line 33:
Changed lines 37-39 from:
step 1. bend the ends of the resistor down
to:
->
step 1. bend the ends of the resistor down & insert into fabric PCB
\\\
February 17, 2010, at 09:47 AM
by 18.111.95.214 -
Changed line 34 from:
to:
February 17, 2010, at 09:46 AM
by 18.111.95.214 -
Changed lines 30-32 from:
\\\
to:
\\\
Changed line 32 from:
\\\
to:
\\\
February 17, 2010, at 09:45 AM
by 18.111.95.214 -
Added line 27:
step 3. (already done for you) laser cut the backing fabric. \\\
Deleted lines 28-29:
step 3. (already done for you) laser cut the backing fabric.
\\\
Added lines 30-31:
February 17, 2010, at 07:26 AM
by 66.92.79.106 -
Changed lines 53-55 from:
step 8. test with power supply
\\
to:
step 8. test with power supply
February 17, 2010, at 07:26 AM
by 66.92.79.106 -
Changed lines 55-62 from:
Groups for Fabric PCB assignment
Group 1: Angela, Yang Yang, Nadia, Rizal
Group 2: Brad, Sarah W., Madeline
Group 3: Elly, Felicia, Dawn
Group 4: Xiao Xiao, Kristin, Ellan
Group 5: Edwina, Amy, James, Sarah B. \\
to:
February 17, 2010, at 07:25 AM
by 66.92.79.106 -
Added line 54:
February 17, 2010, at 07:24 AM
by 66.92.79.106 -
Changed lines 53-54 from:
step 8. test with power supply
to:
step 8. test with power supply
\\
February 17, 2010, at 07:24 AM
by 66.92.79.106 -
Added lines 54-61:
Groups for Fabric PCB assignment
Group 1: Angela, Yang Yang, Nadia, Rizal
Group 2: Brad, Sarah W., Madeline
Group 3: Elly, Felicia, Dawn
Group 4: Xiao Xiao, Kristin, Ellan
Group 5: Edwina, Amy, James, Sarah B. \\
February 17, 2010, at 07:21 AM
by 66.92.79.106 -
Added line 18:
illustrator file with circuit drawing
Changed line 21 from:
protecting: epoxy, binder clips, mold components
to:
protecting: epoxy, toothpicks, binder clips, mold components
February 16, 2010, at 11:00 PM
by 66.92.79.106 -
Changed lines 27-41 from:
step 3. (already done for you) laser cut the backing fabric.
.
.
step 4. peel the paper off of the circuit only where you want it to adhere to the backing fabric.
.
.
step 5. iron the circuit onto the backing fabric.
.
.
step 6. peel the excess conductive fabric away from the backing fabric, leaving the circuit behind.
.
to:
February 16, 2010, at 10:58 PM
by 66.92.79.106 -
Changed line 27 from:
step 3. (already done for you) laser cut the backing fabric.
to:
step 3. (already done for you) laser cut the backing fabric.
February 16, 2010, at 10:58 PM
by 66.92.79.106 -
Changed line 26 from:
\\\
to:
\\\
February 16, 2010, at 10:58 PM
by 66.92.79.106 -
Changed lines 25-26 from:
step 2. (already done for you) laser etch the circuit.
to:
step 2. (already done for you) laser etch the circuit. ->
\\\
February 16, 2010, at 10:57 PM
by 66.92.79.106 -
Changed lines 25-28 from:
step 2. (already done for you) laser etch the circuit.
to:
step 2. (already done for you) laser etch the circuit.
February 16, 2010, at 10:57 PM
by 66.92.79.106 -
Changed line 26 from:
to:
Changed line 28 from:
to:
February 16, 2010, at 10:56 PM
by 66.92.79.106 -
Changed line 26 from:
to:
Changed line 28 from:
to:
February 16, 2010, at 10:43 PM
by 66.92.79.106 -
Changed lines 18-20 from:
conductive fabric, backing fabric, mat knife, iron
LED, resistor, pliers, flux, clamp, soldering iron & solder
epoxy, binder clips, mold components
to:
constructing: conductive fabric, backing fabric, mat knife, iron
soldering: LED, resistor, pliers, flux, clamp, soldering iron & solder
protecting: epoxy, binder clips, mold components
February 16, 2010, at 10:41 PM
by 66.92.79.106 -
Added lines 14-15:
Fabric PCB Tutorial
February 16, 2010, at 10:41 PM
by 66.92.79.106 -
Changed lines 6-9 from:
materials: conductive fabrics, fabric adhesives, microcontrollers
techniques: fabric PCBs, soldering, circuit design
machines: laser cutter
assignment: "hello world" fabric PCB \\
to:
February 16, 2010, at 10:39 PM
by 66.92.79.106 -
Changed line 2 from:
to:
February 16, 2010, at 10:39 PM
by 66.92.79.106 -
Added line 2:
February 16, 2010, at 10:39 PM
by 66.92.79.106 -
Added lines 2-3:
February 16, 2010, at 10:37 PM
by 66.92.79.106 -
Changed line 39 from:
to:
Deleted lines 42-44:
February 16, 2010, at 10:36 PM
by 66.92.79.106 -
Changed lines 39-42 from:
to:
Changed lines 44-45 from:
to:
February 16, 2010, at 10:35 PM
by 66.92.79.106 -
Deleted lines 23-24:
step 3. (already done for you) laser cut the backing fabric.
Added lines 25-26:
step 3. (already done for you) laser cut the backing fabric.
.
Added lines 34-36:
Changed lines 38-40 from:
to:
February 16, 2010, at 10:34 PM
by 66.92.79.106 -
Deleted lines 27-28:
step 4. peel the paper off of the circuit only where you want it to adhere to the backing fabric.
Added lines 29-30:
step 4. peel the paper off of the circuit only where you want it to adhere to the backing fabric.
.
Changed line 32 from:
to:
February 16, 2010, at 10:33 PM
by 66.92.79.106 -
Changed line 22 from:
to:
Changed line 26 from:
to:
Changed line 30 from:
to:
February 16, 2010, at 10:33 PM
by 66.92.79.106 -
Changed lines 22-23 from:
to:
Changed lines 26-27 from:
to:
Changed lines 30-31 from:
to:
February 16, 2010, at 10:32 PM
by 66.92.79.106 -
Added line 23:
Added lines 27-30:
Added lines 32-35:
February 16, 2010, at 10:31 PM
by 66.92.79.106 -
Changed lines 21-22 from:
step 2. (already done for you) laser etch the circuit.
to:
step 2. (already done for you) laser etch the circuit.
\\
February 16, 2010, at 10:30 PM
by 66.92.79.106 -
Changed lines 21-22 from:
step 2. (already done for you) laser etch the circuit.
\\
to:
step 2. (already done for you) laser etch the circuit. \\
February 16, 2010, at 10:30 PM
by 66.92.79.106 -
Changed line 22 from:
to:
February 16, 2010, at 10:29 PM
by 66.92.79.106 -
Added line 22:
February 16, 2010, at 10:29 PM
by 66.92.79.106 -
Added line 22:
Added line 24:
February 16, 2010, at 10:28 PM
by 66.92.79.106 -
Added line 22:
February 16, 2010, at 09:28 PM
by 18.111.95.214 -
Changed line 14 from:
conductive fabric, backing fabric, iron
to:
conductive fabric, backing fabric, mat knife, iron
February 16, 2010, at 09:25 PM
by 18.111.95.214 -
Changed line 23 from:
step 4. peel the paper backing off of the circuit only where you want it to adhere to the backing fabric.
to:
step 4. peel the paper off of the circuit only where you want it to adhere to the backing fabric.
February 16, 2010, at 09:24 PM
by 18.111.95.214 -
Added lines 13-18:
supplies
conductive fabric, backing fabric, iron
LED, resistor, pliers, flux, clamp, soldering iron & solder
epoxy, binder clips, mold components
Changed lines 29-31 from:
step 1.
programming the ATTiny13 \\
to:
step 1. bend the ends of the resistor down
step 2. insert resistor into fabric PCB
step 3. bend resistor legs out slightly and apply flux
step 4. solder resistor
step 5. insert LED with + end (anode) facing resistor
step 6. bend legs out slightly and apply flux
step 7. hold LED with clamp to solder
step 8. test with power supply
protecting the solder joints
step 1. clamp circuit to mold with binder clips
step 2. mix epoxy and pour into mold
step 8. wait for epoxy to cure (approx. 10 mins)
step 8. test with power supply
February 16, 2010, at 08:55 PM
by 18.111.95.214 -
Changed lines 15-19 from:
step 1. (already done for you) laser etch the circuit.
step 1. (already done for you) laser cut the backing fabric.
step 1. peel the paper backing off of the circuit only where you want it to adhere to the backing fabric.
step 1. iron the circuit onto the backing fabric.
step 1. peel the excess conductive fabric away from the backing fabric, leaving the circuit behind.
to:
step 2. (already done for you) laser etch the circuit.
step 3. (already done for you) laser cut the backing fabric.
step 4. peel the paper backing off of the circuit only where you want it to adhere to the backing fabric.
step 5. iron the circuit onto the backing fabric.
step 6. peel the excess conductive fabric away from the backing fabric, leaving the circuit behind.
Changed lines 22-23 from:
soldering a fabric PCB
step 1. iron the circuit onto the backing fabric. \\
to:
soldering a fabric PCB
step 1.
February 16, 2010, at 08:54 PM
by 18.111.95.214 -
Changed line 13 from:
constructing a fabric PCB \\
to:
constructing a fabric PCB
February 16, 2010, at 08:54 PM
by 18.111.95.214 -
Changed lines 14-19 from:
step 1. (already done for you) iron a sheet of Heat-n-Bond onto a sheet of conductive fabric.
step 1. (already done for you) laser etch the circuit.
step 1. (already done for you) laser cut the backing fabric.
step 1. peel the paper backing off of the circuit only where you want it to adhere to the backing fabric.
step 1. iron the circuit onto the backing fabric.
step 1. peel the excess conductive fabric away from the backing fabric, leaving the circuit behind. \\
to:
step 1. (already done for you) iron a sheet of Heat-n-Bond onto a sheet of conductive fabric.
step 1. (already done for you) laser etch the circuit.
step 1. (already done for you) laser cut the backing fabric.
step 1. peel the paper backing off of the circuit only where you want it to adhere to the backing fabric.
step 1. iron the circuit onto the backing fabric.
step 1. peel the excess conductive fabric away from the backing fabric, leaving the circuit behind.
February 16, 2010, at 08:36 PM
by 18.111.95.214 -
Changed line 10 from:
Buechley, L. and Eisenberg, M. (2009) Fabric PCBs, Electronic Sequins, and Socket Buttons: Techniques for E-textile Craft. Journal of Personal and Ubiquitous Computing, 13(2), pp 133-150.
to:
Buechley, L. and Eisenberg, M. (2009) Fabric PCBs, Electronic Sequins, and Socket Buttons: Techniques for E-textile Craft. Journal of Personal and Ubiquitous Computing, 13(2), pp 133-150. \\
Added line 20:
February 16, 2010, at 08:36 PM
by 18.111.95.214 -
Changed lines 12-18 from:
soldering a fabric PCB
- (already done for you) iron a sheet of Heat-n-Bond onto a sheet of conductive fabric.-'
- (already done for you) laser etch the circuit.
- (already done for you) laser cut the backing fabric.
- peel the paper backing off of the circuit only where you want it to adhere to the backing fabric.
to:
constructing a fabric PCB
step 1. (already done for you) iron a sheet of Heat-n-Bond onto a sheet of conductive fabric.
step 1. (already done for you) laser etch the circuit.
step 1. (already done for you) laser cut the backing fabric.
step 1. peel the paper backing off of the circuit only where you want it to adhere to the backing fabric.
step 1. iron the circuit onto the backing fabric.
step 1. peel the excess conductive fabric away from the backing fabric, leaving the circuit behind.
soldering a fabric PCB
step 1. iron the circuit onto the backing fabric. \\
February 16, 2010, at 08:32 PM
by 18.111.95.214 -
Changed lines 15-16 from:
# (already done for you) iron a sheet of Heat-n-Bond onto a sheet of conductive fabric.
to:
- (already done for you) iron a sheet of Heat-n-Bond onto a sheet of conductive fabric.-'
February 16, 2010, at 08:31 PM
by 18.111.95.214 -
Changed lines 12-13 from:
to:
Changed line 16 from:
- (already done for you) iron a sheet of Heat-n-Bond onto a sheet of conductive fabric.
to:
# (already done for you) iron a sheet of Heat-n-Bond onto a sheet of conductive fabric.
February 16, 2010, at 08:31 PM
by 18.111.95.214 -
Changed line 15 from:
'- # (already done for you) iron a sheet of Heat-n-Bond onto a sheet of conductive fabric.
to:
- (already done for you) iron a sheet of Heat-n-Bond onto a sheet of conductive fabric.
Changed line 19 from:
to:
February 16, 2010, at 08:30 PM
by 18.111.95.214 -
Changed lines 14-15 from:
'-
- (already done for you) iron a sheet of Heat-n-Bond onto a sheet of conductive fabric.
to:
'- # (already done for you) iron a sheet of Heat-n-Bond onto a sheet of conductive fabric.
February 16, 2010, at 08:30 PM
by 18.111.95.214 -
Changed lines 14-15 from:
'-# (already done for you) iron a sheet of Heat-n-Bond onto a sheet of conductive fabric.
to:
'-
- (already done for you) iron a sheet of Heat-n-Bond onto a sheet of conductive fabric.
February 16, 2010, at 08:30 PM
by 18.111.95.214 -
Changed line 14 from:
- (already done for you) iron a sheet of Heat-n-Bond onto a sheet of conductive fabric.
to:
'-# (already done for you) iron a sheet of Heat-n-Bond onto a sheet of conductive fabric.
Changed line 18 from:
to:
February 16, 2010, at 08:29 PM
by 18.111.95.214 -
Changed line 13 from:
soldering a fabric PCB \\
to:
February 16, 2010, at 08:29 PM
by 18.111.95.214 -
Changed line 6 from:
assignment: "hello world" fabric PCB \\
to:
Added lines 11-19:
soldering a fabric PCB
# (already done for you) iron a sheet of Heat-n-Bond onto a sheet of conductive fabric.
- (already done for you) laser etch the circuit.
- (already done for you) laser cut the backing fabric.
- peel the paper backing off of the circuit only where you want it to adhere to the backing fabric.
programming the ATTiny13 \\
February 16, 2010, at 09:41 AM
by 18.111.95.214 -
Changed line 2 from:
assignment due: soft circuit \\
to:
February 16, 2010, at 09:41 AM
by 18.111.95.214 -
Added line 7:
February 16, 2010, at 09:40 AM
by 18.111.95.214 -
Added lines 1-9:
Wednesday February 17: Fabric PCBs
assignment due: soft circuit
materials: conductive fabrics, fabric adhesives, microcontrollers
techniques: fabric PCBs, soldering, circuit design
machines: laser cutter
assignment: "hello world" fabric PCB
reading
Buechley, L. and Eisenberg, M. (2009) Fabric PCBs, Electronic Sequins, and Socket Buttons: Techniques for E-textile Craft. Journal of Personal and Ubiquitous Computing, 13(2), pp 133-150.
